OLE Is No Bull
Visual FoxPro’s OLE capabilities move us closer to component-based application development.
By Ted Roche, Contributing Writer
[Originally published in FoxPro Advisor, June 1995. Don’t blame me for the headline (*groan*)!]
Most audiophiles aren’t interested in all-in-one music boxes that play CDs and cassettes, and tune the radio, all with one set of controls. Audiophiles prefer the greater reliability, interchangability, and configurability of a component stereo system.
Similarly, application developers today are discovering that a monolithic solution to business problems—a programming system that incorporates a word processor, serial communication protocols, and database manipulation into a single multi-megabyte .EXE file— doesn’t provide the flexibility to adapt their development system rapidly enough to meet today’s ever-changing business needs. What developers need is a component system. Visual FoxPro is leading us towards that vision of computing with the addition of OLE 2.0.
OLE 2.0 isn’t so much a single feature as a collection of related technologies. One group offers the ability to embed or link data into FoxPro general fields, a capability first introduced in FoxPro 2.5 (using OLE 1.0) and greatly enhanced in OLE 2.0-compliant Visual FoxPro. Visual Editing lets users manipulate OLE objects within the menu and toolbar interface of a VFP application. Another new feature is OLE Automation, the ability to programmatically command and control objects within other applications. Last, but by no means least, OLE Custom Controls give us the ability to plug entire pre-programmed components into our applications.
OLE becomes new again
Visual FoxPro retains backward compatibility while enhancing the OLE functionality of FoxPro 2.6, with continued support for general fields and the APPEND GENERAL, MODIFY GENERAL and @ … SAY oleobject VERB commands. APPEND GENERAL embeds or links data into a Visual FoxPro general field. The new DATA clause lets you pass data directly to an application when you create a new OLE object. This sample creates a tab-delimited data table in the proper format for Microsoft Graph’s datatable, and creates and displays a new graph object:
#DEFINE tab CHR(09)
#DEFINE crlf CHR(13)+CHR(10)
* Graph data columns are separated by tabs ;
* rows are separated by carriage return - line feed
* pairs
testdata = " " + tab + "X-Axis" + crlf + ;
"One" + tab + "10" + crlf + ;
"Two" + tab + "20" + crlf + ;
"Three" + tab + "30" + crlf
CREATE CURSOR SmplGrph (mygraph G)
APPEND BLANK
APPEND GENERAL mygraph CLASS "MSGraph" DATA testdata
MODIFY GENERAL mygraph
There have been no changes to the syntax of MODIFY GENERAL and @ … SAY oleoject VERB from 2.6. The MODIFY GENERAL command brings up an editing window displaying the OLE object. Double-clicking on the object starts the OLE server and allows changes to the data and appearance of the object. MODIFY GENERAL has a WINDOW option (as BROWSE does), which allows the new window to take on the characteristics of a pre-defined window. You can also specify that the MODIFY GENERAL window appear within another window, or on the main desktop with the IN WINDOW <windowsname> or IN SCREEN clauses. The @ … SAY command’s VERB option allows you to send one of a set of pre-defined messages to the OLE server application, such as Play or Edit. The Registration Database determines which verbs your particular application understands. You can examine it by issuing the RUN /N REGEDIT.EXE /V (for 16-bit Windows, or REGEDT32.EXE for Windows NT) command from within FoxPro.
Visual Editing
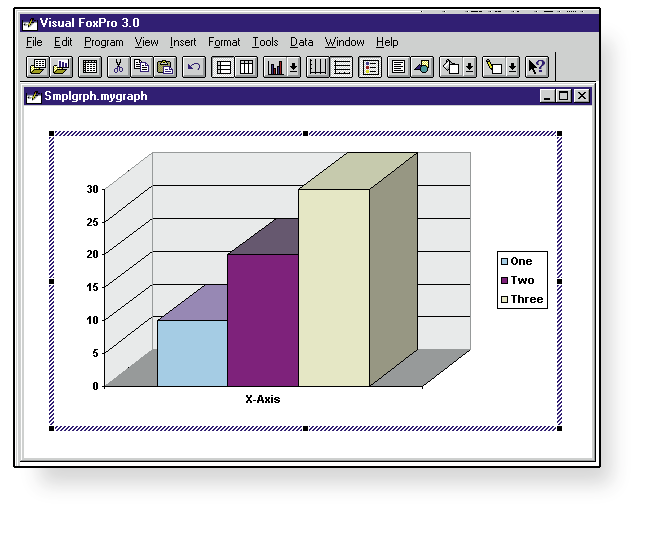
Visual Editing of a Graph
Double-clicking on a MODIFY GENERAL window displays another new feature—Visual Editing. In previous versions of FoxPro, the entire screen changed to that of the OLE server program, with a new title, menus, and toolbars. Studies show that users were jarred and disconcerted by this change. Visual Editing lets your users modify the OLE objects contained within your application, without the appearance of ever having left the application (figure 1).
Visual Editing allows addition of an object’s menus onto the current menu bar, and substitution of the object’s toolbars for your application’s toolbars. This gives the operator a much better sense of continuity and gives your application the appearance of far better integration.
To integrate Visual Editing with your application, you’ll need to modify your menu system to tell the OLE Application where it can place its menu pads. To allow for this, the DEFINE PAD command added the new keywords NEGOTIATE LEFT|MIDDLE|RIGHT, which determine where your menu pads should appear when OLE Visual Editing is going on. Omitting the keyword for any pad drops that pad during Visual Editing.
OLE Automation
With the addition of the CREATEOBJECT() and GETOBJECT() functions, Visual FoxPro exercises much finer control over OLE objects, sending commands to them directly, modifying their properties, or causing them to perform specific functions. This feature, referred to as OLE Automation for the Microsoft Office products, allows for much tighter integration of FoxPro with other applications.
CREATEOBJECT() creates an object from a defined class or an OLE object. When CREATEOBJECT() is executed, Visual FoxPro searches for a class definition with the specified name, first in the current program, then in the CLASSLIB, if one has been specified, and then up the program calling stack. If it fails to locate a class definition within FoxPro, it then searches the Windows Registration Database for an OLE Object with a matching name. If a match is found in the Registration Database, an OLE object is created and its associated server is started.
The neat thing about starting an application this way is that it’s not visible, and won’t be, unless you make it so. Once you’ve mastered the command syntax of the application you’re addressing, you can programmatically perform nearly any task the application is capable of, as if you had borrowed the mouse from the user’s hand and were clicking through the menus. In this simple example, I create an Excel 5.0 spreadsheet, populate a few of its data cells, perform a standard deviation calculation, capture the result, close the application, and release the object:
objXLApp=createobject("Excel.Application")
objXLApp.Workbooks.Add
objXLApp.cells(1,1).Value = "88"
objXLApp.cells(2,1).Value = "97"
objXLApp.cells(3,1).Value = "23"
objXLApp.cells(4,1).Value = "47"
objXLApp.cells(5,1).Value = "55"
objXLApp.cells(6,1).Value = "=STDEV(R[-5]C:R[-1]C)"
myresult = objXLApp.cells(6,1).Value
objXLApp.ActiveWorkbook.Close("False")
objXLApp.Quit
release objXLApp
wait window ltrim(str(myresult,5,2))
Unlike CREATEOBJECT(), which creates a new and empty OLE document, the GETOBJECT() function lets you open an existing document as an OLE Automation Object, then manipulate it. This example uses WordBasic to open an existing file, select all the text, copy it to the clipboard, and close the document.
objtalk2word =createobject("word.basic")
objtalk2word.fileopen("mydoc.doc")
objtalk2word.startofdocument
objtalk2word.endofdocument(1)
objtalk2word.editcopy
objtalk2word.fileclose
release objtalk2word
? _cliptext
? len(_CLIPTEXT)
OLE Custom Controls

Figure 2: Adding an OLE Custom Control to a Form
In addition to linking to exposed objects within other applications, OLE 2.0 allows Visual FoxPro to use OLE Custom Controls (.OCXs) within. These custom controls are the 32-bit equivalent of Visual Basic’s .VBXs—custom tools built to work within VB. .VBXs took the VB world by storm, and a number of third-party developers created very innovative controls. However, .VBXs are specifically designed to work with Visual Basic, and can’t be easily extended to other languages or other platforms. To solve these limitations, OLE Custom Controls were defined. .OCXs were first introduced with the release of Access 2.0, and Microsoft has announced that .OCXs will be supported in all of their 32-bit development tools. .OCXs have the advantage of a larger market share than product-specific add-ons.
Embedding an OLE Custom Control in a form is simply a matter of clicking your way through a few dialogs. In a blank form, select the OLE Container Control. Draw the location on the form where you want the control to appear by clicking and dragging the mouse. A dialog appears; select the Custom Controls button, then the Custom Control you want to use. In the example shown in figures 2 and 3, I use the Outline control included with Visual FoxPro. After placing the control on the form, selecting it, and bringing up its properties, you’ll discover one of the great features of OLE Custom Controls—a Property sheet specific to the control (figure 3).
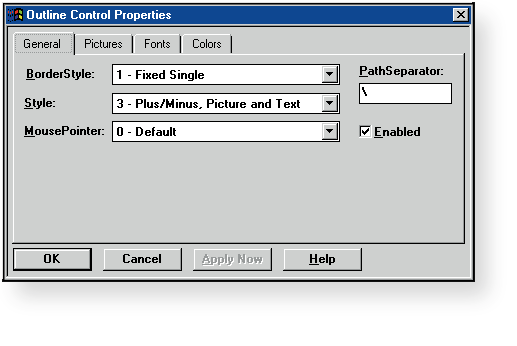
Outline Control Property Sheet
Check out the sample .OCXs included with Visual FoxPro (found in the SAMPLES\OLE subdirectory in the beta version used for this article) and keep an eye on these pages for reviews of other useful .OCXs.
Where are my objects?
There’s some excellent documentation available inexpensively on the OLE Automation Objects currently in the Microsoft Office products. The Microsoft Office Development Kit is a CD-ROM that includes :
-
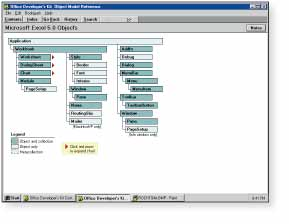
Figure 4: Office Developer’s Kit shows Excel Object Model
Office OLE reference guides to all exposed objects in Excel, Access & Project (figure 4).
- An Object Browser, listing properties and methods of all Office objects.
- User and developer documentation for all Office products and for VB 3.0 Professional.
- Microsoft Mail SDK.
- Excel Development Kit.
- .Word 6.0 Development Kit.
- Microsoft Electronic Form Designer.
The ODK is bundled with newer packages of Visual Basic 3.0 Professional and is also available separately from most retail sources. The Microsoft stock number is 203-052-001, and the typical street price is less than US$100.
What will OLE do for me?
New OLE features simplify the integration of data and functionality from other applications. OLE-compliant applications let you integrate the expertise and debugged code of other developers to deliver more capable and richer-featured applications, while you concentrate on your customers’ needs.
Contributing Writer Ted Roche is a Microsoft Certified Professional, a 1994 recipient of Microsoft’s Most Valuable Professional award and principal in the FoxPro consulting firm, Computer Resource. Ted is co-author of FOXPRO ADVISOR Q&A column. His latest book project, with FoxPro Advisor Editor Tamar Granor, is the Hacker’s Guide to Visual FoxPro (Addison Wesley).
Copyright 1995, 2017 by Ted Roche under a Creative Commons Attribution-NonCommercial-ShareAlike 3.0 Unported (CC BY-NC-SA 3.0) license, https://creativecommons.org/licenses/by-nc-sa/3.0/